Week One of the 1950s Walkaway Dress Sew-Along – How to Fit Butterick Pattern 4790
Hello Ladies! I hope you are all ready to sew some 1950s dresses! Today we will look at how to fit your pattern, and you can cut out your fabrics any time after that. If you do not yet have your material ready, don’t fret as the next step (sewing the darts and shoulder seams) will not come until approximately August 22nd. Make sure you do not cut out your fabrics until you have tried on all the tissue pattern pieces to ensure it will fit properly!
So let’s get started! As I shared earlier, my method for fitting this dress comes in part from the advice of McCalls Patterns Fit Expert, Pati Palmer. If you are interested in learning more about fitting your patterns (which any seamstress ought to be skilled at!) I highly recommend her excellent books on the subject.
If you have never fitted a pattern before, the instructions may look a bit daunting, but don’t be intimidated by the extra steps in fitting! The time you invest now to fit your pattern will help you achieve a fit that never could have happened otherwise for your dress! And trying on your pattern pieces beforehand gives you a “sneak peek” at how the finished dress will look. This is an invaluable skill to know, and is well worth every minute! And as always I am happy to answer questions, so make sure you don’t skip the fitting. : )
To properly fit your pattern, make sure you wear the exact undergarments that you will wear under your 1950s walkaway dress. If you plan to wear a corset or body shaper, be sure you use that as well. Finally, wear a camisole to pin your pattern pieces into (even if you will not be wearing a camisole under the dress.)
1. We will start by cutting out the easiest pieces first. Take your waist measurement over your corset (if you plan to wear one) and cut out the skirt piece accordingly. The skirt will not need to be altered, so you can set that aside until you are ready to cut the fabric.
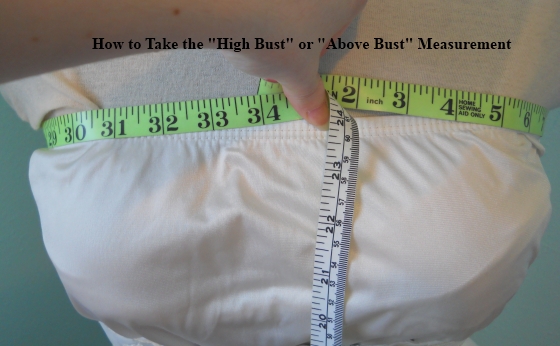
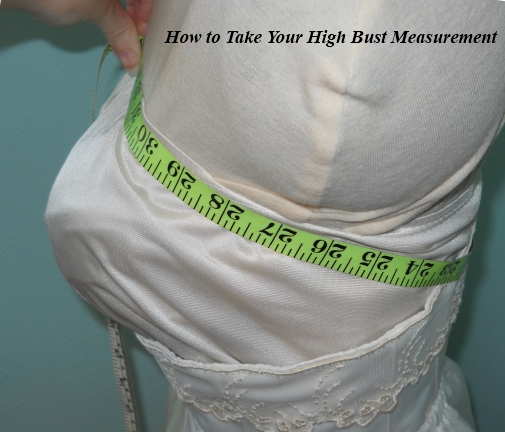
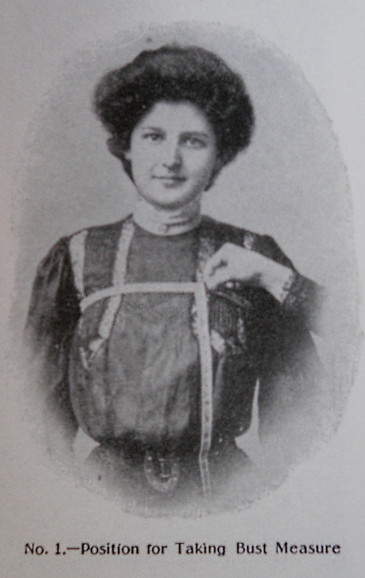
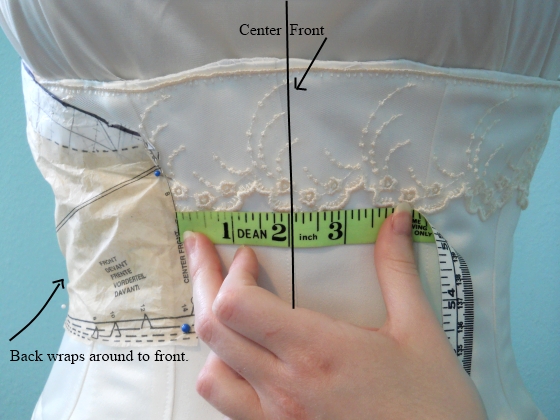
2. Now take your high bust measurement as shown in the photographs. Bring the measuring tape around your chest until it fit snugly just under your arms. In the back, the tape should fit snugly and come down to where your bra would end in the back. (For your information, this was actually the correct way to take the bust measurement back in the late Victorian and Edwardian era! I’ve included a photograph from the 1905 book Dressmaking, Up to Date by Butterick.)
3. Whatever your high bust measurement is, (34″, for instance), substitute that number for the regular bust measurement and cut out your pattern pieces accordingly. So if your high bust is 34″, you will cut out a size 12 in the dress front and back pieces. You are probably thinking, “But that is two sizes too small – my waist measurement is nowhere near a size 12!” And if you didn’t alter it, you would be right! But since this dress has far too much room in the bodice and is actually quite ill-fitted on most figures, just follow the instructions exactly and it will all work out. (You can see pictures here.)
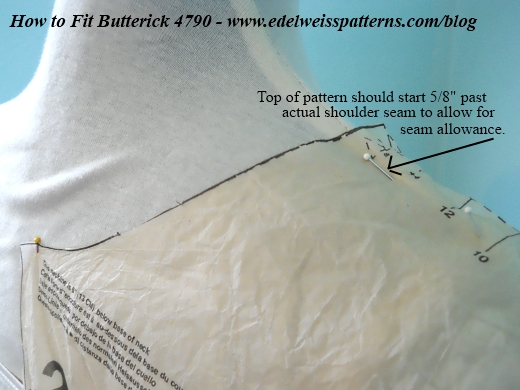
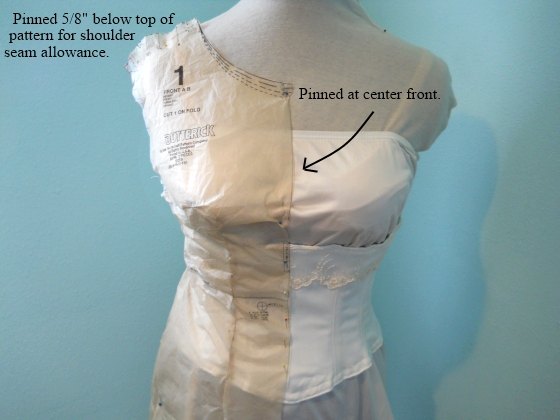
4. Wearing your proper foundation garments, try on the back pattern piece. (Before putting it on, pin in the dart as marked on the pattern piece.) First of all, match the center back edge of the pattern piece exactly with your spine and pin the pattern to your camisole down this line. At the top of the pattern piece, make sure the shoulder starts 5/8″ beyond where your actual shoulder seam would normally be to allow for the seam allowance.
5. Bring the back piece around to the front until it fits snugly and pin in place. Note that the front of the pattern piece is not supposed to come to the center front yet. Measure the distance from the front edge of the pattern to the center front of your body. (For example, 2 inches.) Add 3/8″ to this number, and keep in mind for how much tissue paper you will add. Now mark a straight line with a pencil down the side of the pattern piece at exactly where your side seam would be.
6. Unpin the pattern piece from your camisole and lay on a flat surface. On the line you marked for the imaginary side seam, cut all the way through and spread the two pieces apart. Now comes the fun part! Take a strip of tissue paper and place underneath these two pieces so they are exactly the same distance apart the whole way. You are just adding the necessary width to your pattern piece, so however much was necessary to bring the front edge to the center front is how much you need to add. Tape in place, and you have just fitted your first pattern piece!
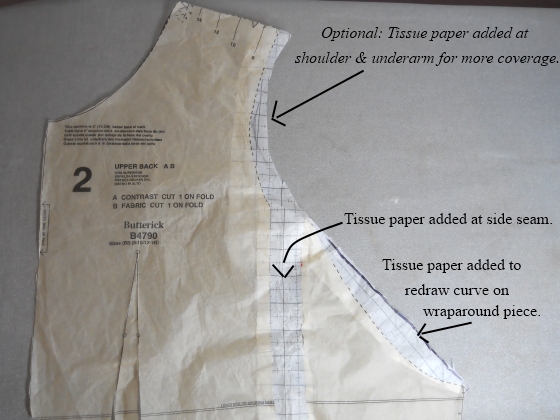
7. So now the back piece fits you in the width, but I recommend redrawing your wraparound curve so it doesn’t hit you so low in the front bodice. This step is very simple to complete, and you can see the photo illustrations for that here.
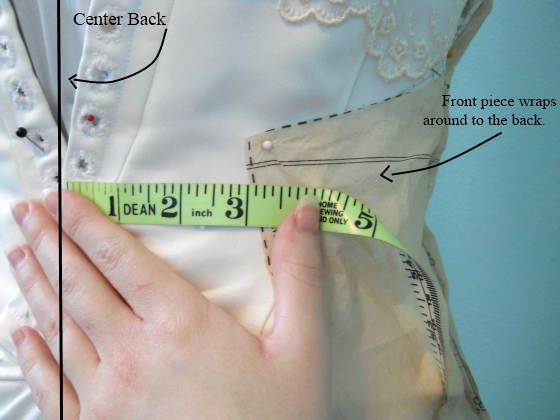
8. Just as you did with the back piece, pin in the darts (all three of them!) on your front pattern piece. Now put this on over your foundation garments, again leaving 5/8″ at the top for the seam allowance. This time, you will pin the front edge of your pattern piece to the center front of your camisole.
9. Bring the piece around snugly to the back and pin in place. Since it does not come to the center back, measure the distance between the pattern edge and and your center back. Add 3/8″ to this measurement to determine how much tissue paper you will add. Note that this pattern piece is only supposed to come to the center back at the very top of it – it is not supposed to even come close to closing through the hip area and below, so this makes fitting it fairly easy.
10. As you did with the back piece, mark the side seam with a pencil down the side of the pattern. Now take your pattern off, unpin all the darts, and lay on a flat surface. Slash the pattern down the pencil marked line and spread the pieces apart over tissue paper. Measure the distance between them to make sure you add exactly the number you found in step 9, and tape the pattern to the added tissue paper.
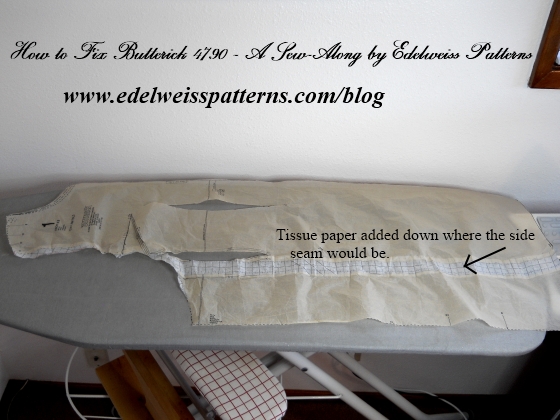
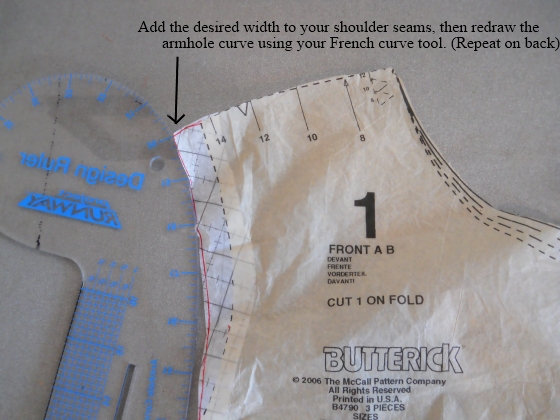
Optional: If you want a little more coverage at the shoulder, you can add a strip of tissue paper to both front and back shoulder edges and redraw the shoulder curve freehand or with a French curve tool.
Congratulations! You have just fitted your pattern! If you like you can pin the front and back together at the shoulder seams and try it on to make sure it fits perfectly after the adjustments you’ve made. (Darts would need to be pinned in place as well.) You don’t want really any “ease” at all in the tissue paper pattern, because the fabric will have much more give to it than the paper does, and Pati Palmer says that a dress will “grow” once you get it out of tissue paper and into fabric. This has always been my experience as well, though if you accidentally made your pattern too big you could still take in some extra fabric in the darts and at the front opening.
Now that your pattern is properly fitted, you can layout the pieces according to the pattern instructions and cut out the material whenever you like. Next week will sew the darts, shoulder seams, and possibly the skirt as well. If you have any questions, don’t hesitate to ask them! I will be away from my computer on August 16th and 17th, but as soon as I can I will answer any questions you may have.
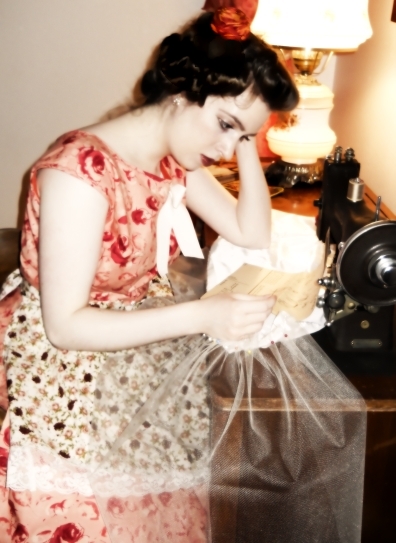
I would like to hear what fabrics everyone has chosen! For this version of Butterick 4790, I am going to sew a two-toned version! The front panel will be a lovely matte satin print with antique looking roses all over it, and the skirt and wraparound piece will be a drapey pink rayon which I found for $2.50 a yard! This dress will definitely be more “evening” than daywear, so I’m sure I’ll have to add some bows and dainty trims to finish it off. What has everyone else planned?

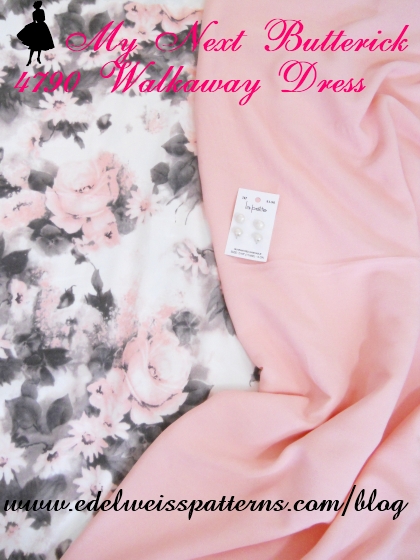


ooooh! What gorgeous fabric you have selected. I’m still debating whether to go two-tone or not. I’d like to try a small print though, so off to Fabric Depot I go.
Thank you Cyndi! Yes, I was just thrilled to find that fabric combination! And a small cotton print sounds perfect for this sort of dress!
Happy sewing,
Katrina
Gorgeous fabric for your next dress! And wonderful tutorial. I just found your blog and am amazed you are making this dress in real time, -today!- and it is not an archive. Meaning, I can follow along, too!! To the fabric stash!
Hello Robin! Thank you for the comments on the fabric! I’m so glad you can join us in sewing this lovely dress, and I am always more than happy to answer questions. It’s going to be a fun sew-along!
Happy sewing,
Katrina
How I wish I had a dressmaker’s dummy! Because I don’t see how I can possibly do this kind of pinning and adjusting on myself. I wish I had a sewing buddy in real life (as opposed to online).
Hello there! I just had a sudden idea that had never occurred to me before. Even if you don’t have a dress form or someone to help you pin, you could easily pin the pattern to the center back and shoulder seam of your camisole while the camisole is laying on a flat surface! Then you would carefully put on the camisole (so as to not stick yourself with the pins) and make the necessary adjustments to the pattern. Hope this helps!
Katrina
Hello Catholic Bibliophagist! Actually unless your mannequin is exactly your shape (which mine certainly isn’t), then I wouldn’t fit the pattern on the dress form, but since I didn’t have another person handy while writing this blog post I just took all the pictures on the manequin for simplicity sake. Doing the tissue fitting on yourself does feel a little funny at first, but once you get the hang of it is not that hard at all! Pinning the front piece is really easy of course, but pinning the piece in back is a little harder if you’re alone. My suggestion would be to get a friend to help with that part, even if she’s not a seamstress, but if that’s not an option I would recommend standing with your back to a full-length mirror so you can make sure the pattern is pinned at the center back point. Let me know if you have any other questions!
Katrina
(P.S. See your updated comment where I gave another tip, as well!)
I can not tell you how excited I am. A couple years ago my sister and I, both vintage enthusiasts, purchased this pattern in our respective sizes. My sister jumped right in to making it and ended up with a big ugly mess. Given that she was a beginner and I was an advanced beginner (at best) we couldn’t fix it. After her disaster, I never even attempted it, banishing it to the back of my stash. While doing some cleaning yesterday I came across the unused pattern and thought to search the internet for other people’s versions. I hoped to find something to renew my interest in it. And here you are! It’s a sign ;)! I am rushing out tomorrow to purchase the fabric (something more casual for everyday wear) and I will be faithfully “sewing along”. Yay!
Hello Jamie, I’m so glad you can join us! Fitting the pattern is really the only tricky part, and once you have the pattern fitting perfectly the dress goes together like a breeze! Feel free to let me know if you have any questions.
Happy sewing!
Katrina
I’m using a stash fabric that’s probably not very period correct; but hey – at least I didn’t have to purchase anything! The trick for me will be trying to make a nursing-friendly version. We’ll see what happens!
Hello Geneece!
Glad you can join us! Stash fabrics are really the perfect things to use, I’ve found, since you can get exactly the fit you want for an initial “prototype” version before you invest a lot in a more expensive material. I’m sure there’s a way to make this dress nursing friendly, too! I bet if you just slash the front pattern piece right through the vertical darts at where the empire waistline would hit you, then add a good couple of inches on either side of the slash line for facing and overlap, you could make it work that way. You can draw the wraparound curve to hit you a little bit higher in order to hide the nursing slit, and no one would ever know! I look forward to seeing what you come up with.
Happy sewing!
Katrina
I’m going to pick up my dressmaking from in a little while. So excited, then I have to decide on a fabric…… there is way toooo much choice.
I need a bit of advice, on the back of the packet where it says notions, what do I actually need to get,and how much?
Sorry if it seems a silly question, I’m new to all of this.
Kind regards, Laura
Hello Laura, For the notions, I usually buy just one or two packages of the bias tape because most of what they allow for with the bias binding is to finish the front skirt opening, which I do either by hand or with machine stitching. So I would stick with:
~1 or 2 packages of double fold bias tape (I always get away with one, but it doesn’t hurt to have a little extra)
~ 3 buttons at about 5/8″ each (for decoration purposes only on the front closure)
~ 4 snaps at 3/8″ or 1/2″ each (three for closing the front, and one for closing the back underneath the wraparound piece)
Let me know if this answers your questions. Happy sewing!
Katrina
[…] dresses! Does everyone have their patterns fitting properly according to the instructions I gave last week? If you have any questions about the fit, I am more than happy to answer them, […]
Thank you, Katrina, for both of your replies. Real Life prevented me from fitting the pattern last week, but I’m back on track now and will be sewing along — albeit a week behind everybody else.
–C.B.
Hello Catholic Bibliophagist,
Don’t worry about being behind! I’m sure you can catch up, and once you get it fitting properly the dress comes together very quickly. Feel free to let me know if you have any more questions.
Happy sewing!
Katrina
I’m new to pattern fitting, so I have a stupid question about the easy part! When it says to take your waist measurement and cut out the skirt piece “accordingly,” does that just mean to cut the pattern on the size line that goes with to that waist measurement–for instance, if the waist measures 28, to cut on the size 14 pattern lines? And if the upper bust calls for cutting on the size 12 lines and the waist calls for a 14, would it work to use the 14 lines for the front and top back pieces everywhere but the neck and shoulder seams? Thanks for a great site!
Hello Karen,
Yes, that’s exactly right! The skirt shouldn’t need to be altered at all, so just cut it out according to whatever your natural waist measurement is. As far as cutting the front piece, you can choose to cut the larger size at the waist, though you will still end up needing to add some width to make it wrap all the way around you. So I just prefer to cut out the entire front and back pieces according to the upper bust measurement, and that way I can just add a straight strip of tissue paper to the side seams, rather than adding more up top and less down below. Feel free to let me know if you have any more questions.
Happy sewing!
Katrina
Great job on this post! (well all your posts) but the look of these are so cute for the “dress sew alongs”
Makes me want to make something cute and pretty.
Thank you, Brielle! The walkaway dress sew-along has been a lot of fun! I will be posting pictures of my latest Butterick 4790 dress soon!
Happy sewing
[…] Week 1 of the Sew-Along (How to Fit Butterick 4790) […]
Another dumb fitting question! I’m just starting to wrap the pattern pieces and it seems like the back piece isn’t going to need any added to the sides and the front piece very little. Am I doing something wrong or do I just have a hopelessly un-50’s figure? I have a fairly large rib cage, so my over bust measurement and waist measurement both come out to the specifications for the size 14.
Hello Jeri,
Glad to hear the pattern is fitting well! I would say that if it fits as it is, that’s great! The “average” person needs to add some to the tissue pattern since they’ve cut the pattern two sizes smaller than normal, but if it is fitting well I would think it would be just fine to leave it as it is.
Keep up the good work!
Katrina
[…] our Butterick 4790 50s dresses! If you have not finished all the previous steps mentioned in Week 1 and Week 2, don’t worry – you can post the link to your finished dress pictures […]
Measuring more carefully I did find I needed to add an inch plus 5/8 to the back. I think I’m going to lay down with a cold compress for awhile before I start on the front. You PROMISE this is the hard part, right?
Hi Jeri,
Pattern alterations are a bit tricky at first and not necessarily the most fun or enjoyable task, but once you get your pattern fitting properly your dress will turn out so much better! Yes, once this is done you will just follow the directions, so it will be much easier. And be encouraged, because many seamstresses sew for years without ever learning to fit their patterns! This is definitely considered an intermediate skill, so keep up the good work!
Happy sewing,
Katrina
I’m just relieved that the darts appear to be in the right places! I think I’ll finally be able to start cutting the fabric this weekend.
That’s great, Jeri! It is immensely more enjoyable to sew a dress that you know will fit properly.
Keep up the good work!
Katrina
I can see this is going to be a two person job. Which is always my downfall. I have to wait for my schedule to coincide with my mum or sisters schedule so I can get the help.
Shall bookmark this page for future reference.
Yes, it is definitely helpful to have someone help you fit the pattern! The other option is to pin the pattern to a camisole that is laying on a flat surface, then carefully put the camisole on without tearing the tissue paper – easier said than done, but it does give you another option.
Happy sewing!
Katrina
Would you recommend making a toile of the bit which needs the pattern adjustments initially?
Hello LadyD,
It is really up to you whether to make a toile/muslin or not. If you have done tissue fitting before you will be able to tell just from looking at it if any adjustments need to be made, but if you want to make a mock-up of just the front and the back bodice (which would not require very much material), then that would be just fine. I personally didn’t do a mock-up for any of these, but I did use my first dress (the orange 50s dress) as a practice version since I had purchased the fabric at such a huge discount. But whatever works for you is great!
Katrina
I got a question with sizing. My chest measurement is between two sizes (if there was a option for it would be size 13) and hip and waist (hip the bigger size than waist) measurement seem to fall under two different sizes…I’m in a quandry which I should follow? DO I err on the large side or go for smaller measurement.
Hello LadyD,
Well be sure that you cut out the skirt according to your waist measurement, as the skirt is so full that the hip measurement won’t matter at all. For the bodice, I would go with the larger size, just because you can always take more in, but you can only let so much out if it’s too small! But be sure that the tissue bodice is fitting well before you cut out your material.
Hope this helps!
Katrina
Thanks. Only one last question…I hope.
I’m confused by the phrase.
“Add 3/8″ to this number”
I’m used to measurements in metric (working in imperial measurments is new to me) so just need to clarify does it mean add 3.8inches?
Hello Lady D,
When you add 3/8″ of an inch, it’s just1/8 of an inch smaller than 1/2″ an inch. Unfortunately I don’t have my metric measuring tape handy or I could convert it for you.
So its a fraction of an inch (as in three, eighths)?
Hello Lady D,
Yes, exactly – it’s just under one half on an inch.
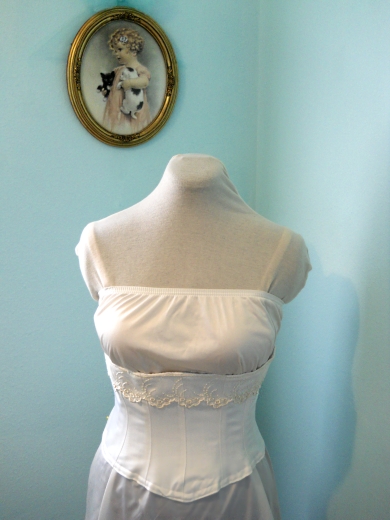
My question is, did you make that corset? If so do you know what pattern you used?
Hello Katie,
Yes, I made that corset from Simplicity 9769! I just omitted the busk down the front so it can be worn over modern day clothing without those funny “knobs” down the front.
Hope this helps!
Katrina
Hi there! I was wondering about how much yardage did you use for the top floral part of your dress? I found this BEAUTIFUL fabric at a shop but it’s extremely expensive so I wanted to try out a two-toned dress like yours, but I am unsure about how much to actually buy.
Thanks!
Claire
Hello Claire,
Hmmm… well going off the yardage amounts, you’ll need between 1.25 and 1.375 yards for view A. It is actually the entire front panel, not just the front of the bodice that was made from the rosy satin, so that’s why it seems like it’s quite a lot of material just for the front. But the charming effect of two separate fabrics on this dress is definitely worth the investment, I think, and I’d love to see pictures of what you come up with!
Happy sewing,
Katrina
Bookmarked for when I am not nursing or postpartum!!! Cannot wait to have something that fits properly. Good work!
Thank you, Stefani! I hope it will be helpful to you. : )
Happy sewing,
Katrina
I just found this and WOW am I glad! I’ve had this pattern for a long time and never wanted to get into tackling it, for the same reasons mentioned — when you look at the original drawings it seems such a stunning dress, but then the photo of how it was made from the pattern disappointed me. NOW I can jump in (years later than when you originally put this up, LOL) with the confidence that, when finished, it will look as it should. Thanks so much!!
Hello Jules, I’m so glad you found this! It really does make all the difference between having a “hospital gown” and having something that looks like a 1950s vintage dress. : ) I’m always happy to answer questions, so do let me know if you need any help along the way. Happy sewing! ~ Katrina
Hi Katrina!
I found your website a week ago and have been pouring over the details of your sew-along. Thank you so much for all the detailed instructions; I am just starting on my vintage garment-making journey!
I don’t know if I’m “lucky”, but my measurements (with the foundation garment) are pretty close to pattern size 12 (High bust: 33.5, Waist: 26, Hips: 35), but uh, I have very little chest (thank you Asian genes). So although I went through the fitting process, there didn’t seem to be any necessity to add any width anyplace. However, I had an issue with the fit in the shoulder area. I am very narrow shouldered, so I found that the pattern seem very wide in the shoulder and under the arm. Do you think it would be ok to trim the pattern to make the shoulder area more narrow and to make sure there is no excess fabric under my arm? Thanks in advance!!
Hi Nancy!
Welcome to the wonderful world of sewing! I’m sure it’s a journey you will always enjoy! I know what you mean about eliminating the bias tape, but the problem is that these curved necklines and armholes would pucker if you just turned under the raw edges, and look all scewed. If you really don’t want to use bias binding, you could always create a facing for the neckline and armhole, but that takes a lot more work. Bias binding is kind of a short-cut to sewing, and I use it all the time! 🙂
Happy sewing!
Katrina
I didn’t read through all the comments but I happened upon this blog searching for something completely unrelated lol…BUT I made this dress 7 times over for a wedding this past Summer. In order to wear a proper crinoline underneath you really need to cut off the front at the same point where the back bodice is cut and then you can pop on a gathered skirt in the front…otherwise it will hang funny with a full crinoline. I haven’t seen the end results yet, but it worked wonderfully for all of the bridesmaids. I do have to say your fitting tips are wonderful, this is pretty much what I had to do to each individual girl! BUT the results were amazing!
Hello, just discovered your blog. I don’t have a problem with the bust but my waist is 3″ bigger and Im using the sz 22. How do I adjust the waist?
Thanks
Hello, Kathleen!
Well, I would cut out the upper portion of the bodice according to your bust measurement, and then cut out the waist area according to your waist measurement. You will need to redraw the side seam slightly to be nicely sloping from the bodice to the waist. But it might be a good idea to try a muslin version to test the fit, and it the waist is too big then I’d go with the instructions I showed in this tutorial.
Please let me know if you have any more questions! (Oh, and obviously if the waist is cut bigger you will also need to use a larger size of the skirt so that the two match up at the waist seam.)
Happy 1950s sewing!
Katrina
I know this sew along was a while ago, but I just found your blog. I have a fitting question. I have a DD chest and always have to do a full bust alteration. I use the high bust measurement,then adjust from there. If I do that here, then use the appropriate lower measurement?(I am a pear shape, so the high bust size would NOT come close). I think I am going to have to play with the muslin to see what works best. I am still new to fitting and can only do some of the more basic alterations.
Your dress is LOVELY! I am planning to make a Pink silk satin with black taffeta contrast for a formal event in the fall, but I want to get the fitting done properly first. Thank you for sharing your dress!
Hello, Karen,
Glad you found the sewalong! Hmm, well I’m probably not the best person to give advice on doing a large bust alteration as I’m a super petite in the chest area (which has it’s fitting challenges too – believe me!). 🙂 But my best guess is that when making a muslin or trying on the tissue, you might want to just cut it out according to your normal measurements (bust, waist, etc.), and then if it is too large in the high bust/above bust area, you can just pin in the excess pattern tissue until it fits. Then you can tape the tissue in place where you pinned it, and cut out the fashion fabric according to this altered pattern.
It might take a little extra work, but making sure the tissue fits perfectly before you cut out the dress will make all the difference!
Happy sewing!
Katrina
[…] Explaining that they reshaped the pattern for a contemporary figure, the Butterick representative gave the original 1952 design details to Katrina, which she explains in week 1 of her sew-a-long. […]