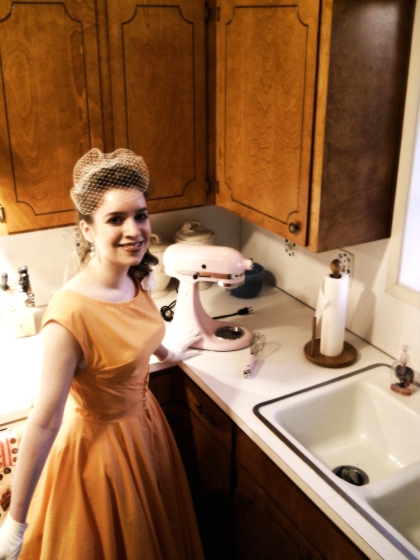
Hello Ladies!
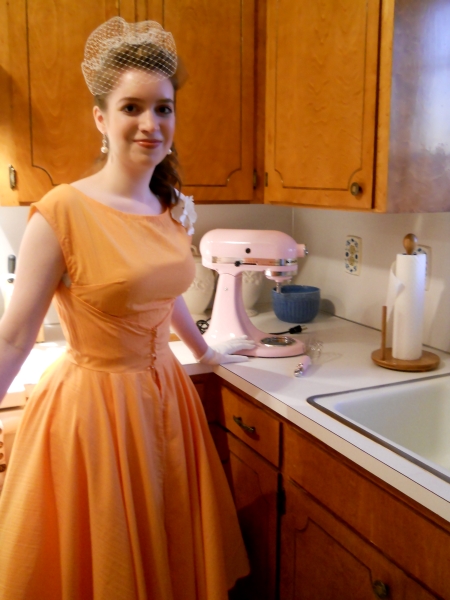
I am excited to share some pictures of a vintage 1950s dress I’ve been wanting to sew for months! This 50s style dress was more or less made from Butterick pattern 4790, with some alterations to make it look like the original pattern that was printed 60 years ago. If you have ever wondered how to sew a 1950s dress, I would highly recommend this pattern with the recommended adjustments.
When I first saw the original sketch on Butterick’s website, I thought, “Oh, that’s gorgeous!” But after viewing their picture for the actual dress they sewed from the pattern, I was a bit puzzled. “Is that really the same pattern?” I wondered.
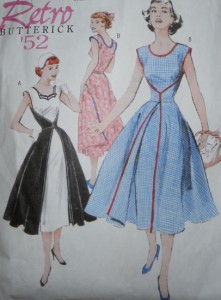
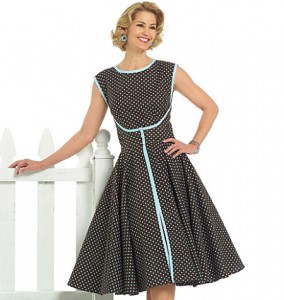
Even a casual observer would probably notice that the bodice isn’t well-fitted, the wraparound bodice pieces are too low, and the skirt hangs down around the knees instead of standing out in a “pouffy” fashion. In short, it didn’t look like a 1950s dress, but I was sure there was a way to fix it! (If you read the pattern reviews online, most seamstresses complain that Butterick 4790 doesn’t fit like the pattern illustration shows, but the solution for that is to fit your dress as you go along so you can see what you need to change.)
Last year I talked with McCalls Fit Expert Pati Palmer about it, and she confirmed my suspicions that this wasn’t the original pattern they used back in the 50s. Pati informed me that all the vintage patterns are redesigned for the modern figure (which isn’t always a pretty sight!), though the pattern companies often use the original artwork. And she should know, since she’s been designing patterns for McCalls since the 1970s! So together we did the “tissue fit” of the pattern on me, and she insisted that I choose my pattern size by the “above-bust” measurement, rather than the regular chest measurement. So if your collarbone circumference is 31″, you would use a pattern size 8 (substitute the “above-bust” measurement for the regular bust circumference). Of course this makes it much too small everywhere else, so you just add width to the side seams to fit the rest of your body. I was a bit apprehensive about using this method, but Pati assured me that it is the best option, because “the collarbone area is the hardest part of your body to fit,” she explained. So as long as it fits in the shoulder area, you can easily widen the rest of the pattern, try it on to make sure it fits, and continue with your project!
And it worked out great! I usually have too much room in the collarbone anyhow, but this is one pattern that fits perfectly now! So back to the rest of the alterations to make this pattern look like the pattern cover – I decided there were a few simple adjustments that should make this pattern fit well and look like a classic 1950s dress!
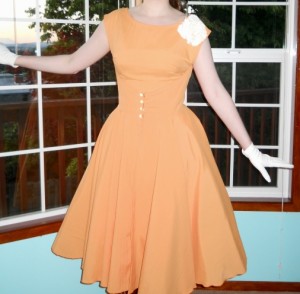
- Make the bodice more fitted in the collarbone (already described above).
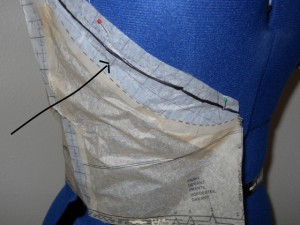
- Redraw the “v” shaped bodice wrap-around to hit higher in the ribcage.
- Have the bias binding visible only on the inside.
- Wear the appropriate foundation garments for a fuller skirt and smaller bodice!
The second alteration is very simple, and I show how to do it below:
-
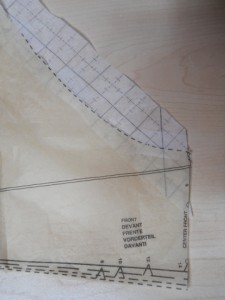
- Place a strip of pattern tissue paper behind the curved part of the back bodice wrap-around. Tape in place.
- Redraw the curve to be more of a “v” shape, rather than a “u”. (It will just look like a diagonal line right now, but with one on either side it will look like a “v”.)
- Cut off the excess pattern paper.
Once these steps are done, you can follow the pattern instructions exactly, although I chose to sew the binding so that it is only visible on the inside. While the pattern instructions tell you to simply encase the raw edge in the bias binding, my impression of the visible (and often contrasting) bias binding is that it gives the dress a rather homemade look. One lady who has sewn this pattern even likened it to a hospital gown! So simply stitch the bias binding on the right side of the fabric, trim the seam allowance down, press well, turn the binding to the inside, and handstitch in place.
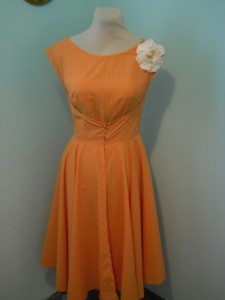
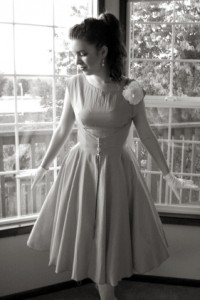
Lastly, wear a corset and a crinoline! I am always amazed when I see pictures online of a 1950s reproduction dress which is worn without any support to make the skirt stand out. If you want to look like a 1950s lady, you definitely need to wear what the women from that era wore to achieve the same silhouette. True, they really wore girdles instead of corsets, but a corset will do basically the same thing, and many of us already have a corset or two that we’ve sewn for other fashion eras. Below are “before” and “after” pictures of how the exact same dress looks with and without the afore mentioned foundation garments. It really does make a huge difference! When you wear a crinoline skirt underneath, the dress skirt has a lovely “swoosh” whenever you move.
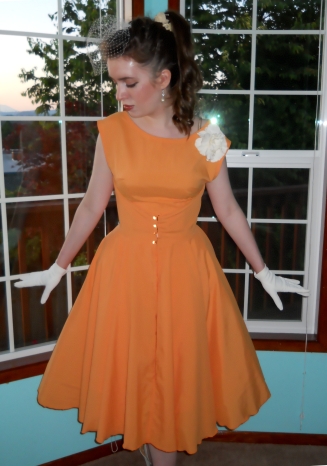
So next time you need a 1950s dress, try this method for a fairly simple-to-sew pattern! I added a flower pin, white gloves, and birdcage veil, but it would look cute with a vintage hat, too!
UPDATE: If any of you are interested in how to sew the 1950s walkaway dress, feel free to join our Butterick 4790 Sew-along that’s happening in August!


You know this pattern has been popular with many…but the fit has been a huge complaint huge! Now your instructions should be disseminated far and wide for the next generation. I’ve wanted to make this dress but the complaints detered me. I don’t want to waste 5 yards of fabric, ok? But your clear directions give me renewed faith. Now to find the pattern. Is it still in the Butterick catalog? Maybe I’ll buy it the next time it’s on sale. I can see this in red and white gingham. But I always see many things in gingham with matching bias!
Hello! Yes, Butterick 4790 is still in the Retro section of their summer 2011 pattern catalog, with no sign of going anywhere soon. : ) And that’s an excellent idea about the red and white gingham – It sounds like the quintessential 1950s housewife outfit!
Happy sewing,
Katrina
Beautiful! I have an original copy of the design that I think will need to be altered a bit, thanks for the advice, I’m looking forward to making it!
I just found your blog, and I love this post. I totally agree with you – if the 50’s silhouette is desired, then the period-correct foundation garments. I really love this dress pattern. The fit you’ve achieved is perfect and an inspiration for me to try it out!
I wished I had seen this about a month ago. I made this dress up in a beautiful navy dotted silk. It was a disaster and looked completely awful on me. With your notes, I think I will try again. Thanks for the lesson
Thank you for this very helpful analysis of a popular pattern! I am about to try it out, but was concerned after reading all the other negative reviews out there. Where do you get your crinoline?
Hi Cindy! I’m so glad you enjoyed the post! I made the crinoline myself, which is really quite simple to do. Take a piece of lightweight lining, about 45″ wide by 10″ long, and sew the two short sides together (so the piece is now 10″ by 21″ when it is flat.) This is the piece that will start at your waist and go to about mid-hip area. Make a casing at the top, insert 1/4″ wide elastic, and sew closed. On the bottom (unfinished) edge, zigzag or serge the raw edges. Now take a piece of crinoline or very stiff net that is about 54″ wide by 12″ long. Fold the crinoline so it is 27″ x 12″, and stitch the side seam down the 12″ side. Gather the top of the crinoline (the 54″ circumference), and sew it to the bottom of the lining piece on the edge that you zigzaged. That’s it! Crinoline won’t fray, so there’s no need to finish the edges of that.
I suggest trying on the crinoline petticoat with your skirt to see if it gives you enough “pouf”. If not, you can sew a short ruffle (about 6″ high by 108″ wide) on the inside of the crinoline at the bottom. If you use this method, you’ll just gather up the ruffle first, then line up the bottom of the ruffle with the bottom crinoline edge, and stitch the top of the ruffle to the inside of the crinoline skirt. It sounds like a lot of steps, but you can whip one out in around 15 minutes or so.
Hope this helps!
Katrina
What a absolutely wonderful post!!!!
Hello! I’ve popped on over from sewweekly.com! Thanks for the great tips–this clears up a LOT of confusion over vintage repro patterns–I knew the finished products wouldn’t look like the drawings, but I never imagined just how off they could be. Incredible job on this dress, as well–just lovely.
so glad I found this (via sewweekly) because I have had this pattern from a 99cent Joann’s pattern sale-sitting around for a year now in my pile of to-do projects! I was hesitant to make it because I usually sew vintage patterns from well, vintage patterns! This was a repro-but my figure fits more of a vintage fit…I have a very small waist and it seems even the vintage patterns I have to adjust the collarbone to get acurate anyway, but your tips were perfect! Thanks, and I will be making this soon! I love it in orange, great choice. I think I’ll do a fun lavender with some yellow peep-toes and a yellow flower! Thanks!
This is so informative. I didn’t know they refracted pattern reissues and your changes really improved the design. The undergarments really make the dress authentic. It’s just lovely on you. I will try to measure my collarbone. Last time I used a fifties pattern with the bust measurement 34 it was too big.
How wonderful to have found your site! It is so rewarding to have seen your finished garment and become inspired to try it 🙂
I have the pattern, not the old one, but the Retro one and since reading so many comments all over the Web, I have stayed away from sewing it.
But now, I am excited to try to make it and wear it with glee!
Thank you again for sharing your expertise.
I had the same disappointing results with this pattern. It totally looked like a hospital gown. Thanks for the info. I really wanted to love this pattern and now I can take another shot at it.
Your fit tips are excellent, and I’ve wondered why the pattern produced such poorly fitting dresses. I may give it a try now!
I have read poor reviews of this pattern which have turned me off. Your dress looks fantastic and very well fitted. Thanks for the tips and I think I may add it back to my list.
[…] simple adjustments to the pattern to achieve that authentic 1950s look. You can read more about it here. I love the way the dress turned out, and I plan to make another one using this pattern […]
Absolutely beautiful! I’ve seen many renditions of this retro pattern on various sites, and none of them looked as good as yours. I’ve also read the bad reviews of this dress, but still wanted to make it. I did see other versions of it online — one had a V neck collar, another one had the dress all of the way up to the neck with a small collar, and other interesting versions. Personally, I think the bias tape tends to make it less cute, and looks more of a dress to clean house. I plan to make this dress soon, and will follow your adjustments. Thank you so much for sharing what you learned.
Hi,
I think the dress looks wonderful. I just had a quick question: when you wear the dress with the corset, doesn’t it affect the fitting of the dress? I would have thought if the dress was fitted on your body, and then worn over a corset it might not fit the same.
Hello Yaz,
Actually I made the dress so fitted that it was a bit too tight without the corset! But yes, if you do plan to wear a corset you should also wear it when you’re fitting your pattern. Thanks for the comment!
Katrina
Aargh! I used to own an original of this but I sold it because I was afraid to use an actual vintage pattern. I didn’t realize it had been redesigned. Vintage patterns always fit me better than modern ones.
I’m kicking myself. At least I now know how to fix it.
Wow, that really DOES look better!! Great job figuring that one out!
Really? Just add to the side seams? And it’s alright? Awesome
Hello Suzanne!
Yes, that’s really all there is to it. Just have some extra tissue paper handy and tape it to the edge of the side seams. (I use a strip that is several inches wide.) Then, while “wearing” the pattern, pin through the paper you added where it appears to fit properly. If you have a friend helping you fit the dress, have her mark right along where you pinned with a pencil or pen. (If you’re fitting it alone, leave the pins in place and mark the pin line once the pattern is off and laying on a flat surface.) Then simply add 5/8″ past the marked line, and that’s it!
Hope this helps,
Katrina
Where exactly do you measure to get your upper bust measurement? Do you just put the tape snugly under your armpits and measure around the chest and back?
Hello there! Yes, your “upper bust” measurement should be taken snugly underneath the arms, though technically the tape should slope down in back a little bit to where it is actually at the level where you’d usually measure for the bust.
Hope this helps, and glad you enjoyed the post!
Katrina
This is soooo helpful, thank you. I have admired the pattern and the vintage drawings for such a long time but have been seriously put off by the modern makes. I will have to research how to take the upper bust measurement accurately but Im sure I can figure the rest out. Thank you for saving me a potentially wasted project. I am very grateful.
You know, I almost started to cry when I read this post. It’s just so mean to pretend to be real! I ordered a huge pile of Vintage Vouge patterns a couple of months back, and I would be so disappointed if they also turn out to be fake-vintage – I’ve emailed them and asked. About the crinoline – I would really, really love an instruction with pictures! Do you think it would be possible…?
Yes, I think I will try to give a tutorial in the future for how to make a 1950s crinoline, or at least how to sew a crinoline that gives the appropriate silhouette! I am finishing up my second walkaway dress, so hopefully in a couple weeks or so I can show how to make the crinoline. Thanks for asking!
[…] does not fit the way the original pattern cover shows. But as I share in my post “How to Make Butterick 4790 L0ok Like the Pattern Cover”, it really is not that hard to take this basic pattern and make it look authentically […]
I had no idea they changed the reprint patterns for ‘modern figure’! I am glad so many of mine are the originals then….my figure is definitely 1950s…not 2000’s…! Thanks for the tutorial!
My question is: How exactly do you wear a crinoline under a wrap dress? Or did you alter it so its not a wrap dress? Because I made a version of this and would love to wear a crinoline with it, but have no idea how that could work. Thanks!
Hello Jennilee, It is a bit confusing at first to try to image a big, pouffy crinoline under that straight panel! It took me a while to figure it out, but once I did it is actually very simple! You can read the full instructions in my post here: https://edelweisspatterns.com/blog?p=850
Hope this helps!
Katrina
[…] 3. Whatever your high bust measurement is, (34″, for instance), substitute that number for the regular bust measurement and cut out your pattern pieces accordingly. So if your high bust is 34″, you will cut out a size 12 in the dress front and back pieces. You are probably thinking, “But that is two sizes too small – my waist measurement is nowhere near a size 12!” And if you didn’t alter it, you would be right! But since this dress has far too much room in the bodice and is actually quite ill-fitted on most figures, just follow the instructions exactly and it will all work out. (You can see pictures here.) […]
Ohh, oh! I found this article just as I was about to cut my muslin!….thats really good to know that Butterick messes with the vintage patterns, shame on them. Every cutie chicka that wants an authentic dress, with the severe styling the 50’s are classic for. Why do they think this pattern is so popular?. Thank you so much for your tips. I had planned on completely refitting the bodice and fixing the neckline and sleeve seams as per patternreview but your wraparound slope idea is just the tops!
Hello Mary,
Glad you found this article! I agree that it fits so much better with the adjustments. : ) I’m now sewing my third version of Butterick 4790, and we’re having a sew-along on the blog which you are more than welcome to join in on!
Happy sewing,
Katrina
Wow, I am so happy about your article which I found by chance now. You made something great out of it!
I have the pattern at home since long and was so far reluctant to sew the dress becuase I always felt it looked DIFFERENT in the reality version by Butterick and when people showed what they made out of it on the internet. And what always hit my eye was that the body part had that U and not the V as on the pattern picture. Plus no one’s version had such a small and emphasized waist as on the pattern picture. In the beginning I thought: well, that’s fashion illustration, no woman has such a waist. But than I realised that in the 50s all women used to wear corsages or camisoles – so that it might as well be that it looked like that.
Thank you so much! Especially for showing how you changed the U into a V!!!!
What – for me – still seems not to match the pattern picture is the outer part of the skirt. It seems like it wasn’t that full in the original. I mean look at the black-and-white version – the outer skirt falls to the side and we can see(a lot of)the inner skirt when the woman is standing. In nones version of the dress I saw it like this. Don’t you think there could be something “wrong”, too?
Claudia
Hello Claudia,
Glad you found this 1950s dress article! I agree that probably not many women had waists as tiny as what the illustrations show, but like you said fashion illustrations are often times exaggerated. As far as the skirt goes, the skirt does not naturally hang open as wide as the illustrations show either with or without the crinoline underneath. I am currently studying four versions of the Butterick walkaway dress pattern (one from the 50s!), and the pattern back then was nearly exactly what the skirt is now. When wearing the walkaway dress you can spread the circle skirt apart (to the sides) if the dress is made of a stiffer fabric like a cotton broadcloth, but mainly the pattern cover was drawn like that in order to illustrate how the dress was constructed and just what pieces it had. The only way I’ve found that the skirt will actually do that is if you sew one side of snap to the inside of the circle skirt and the other side of the snap to the right side of the front sheath panel. That way it will hold it in place, but you can still unsnap it to come to the center front when you prefer. I am currently sewing a dressier version of Butterick Pattern 4790 which will have this skirt option, so you may want to check back next week for pictures of that dress.
Finally, the skirt I sewed was made exactly as the pattern was designed back in the 1950s, so again any illustrations were just the artist’s conception. On the evening dress version (black and white dress on the orange-haired lady), you can see a bit more of a drape than on the blue checked cotton gingham drawing. The orange dress that I sewed in this post was made of a very drapey faille and therefore had a soft, fluid quality to it. However, my next version was made of a crisp cotton print and ended up looking more like the pattern cover. (You can see pictures of this 1950s dress here.)
Hope this answers your questions, and happy sewing!
Katrina
[…] you perfectly. I personally adjusted the bust part and the shoulder line to my body and followed this tutorial to make the dress look more like the pattern cover. I also decided against the bias tape on the […]
[…] and see what kind of response you get while doing your usual activities! The first day I wore my orange 1950s dress out, I heard constant exclamations of surprise almost non-stop! Some older ladies who work at a […]
Is the skirt part made out of panels or in a 60 circle skirt?
Hello Emma,
The skirt is made of two panels that each look like a half-circle. Technically it’s still a circle skirt, but you can use either 45″ or 60″ wide material for this dress. Hope this helps!
Happy sewing,
Katrina
I don’t have any pattern tissue paper. Would tracing or paper used for lining baking trays be an adiquite suppliment?
Hello Lady D,
Yes either one of those types of paper should work just fine. Tissue paper does tear easily, so something sturdier may actually be easier to work with.
Happy sewing!
Erm….wonder if you can help me. I’m stuck at the first hurdle. Worried I’m going to make a wonky dress…again. :worriedface:
http://stitchintimeandspace.blogspot.com/2011/10/making-starttrouble-with-fitting.html
Have I done it right? Because even before I try to make it a V the ‘curve’ of the bit which wraps round seems to come quite high.
Hello LadyD,
Don’t worry! Fitting the tissue pattern is a little tricky at first. Before you do anything else, you will definitely need the pin in the darts as instructed in the tutorial, since this will drastically affect the fit. As far as the wraparound curve goes, that is still plenty low in comparison with the original design and the way my 50s dresses fit me. Even if you decide later on that the “v” curve is too high for your liking (once the dress is partially sewn), you can always trim some extra fabric off.
As far as the bodice itself, did you add the tissue paper to the side seams yet? If so, and assuming that the bodice front piece was wide enough to come to the center back, I would take in some width down the side by simply making a vertical fold and pinning it in place until the bodice front piece is just wide enough to go from the center back to slightly over center front.
Keep up the good work, because it will get easier from here! I am always happy to answer questions, so do let me know if you have any more.
Happy sewing,
Katrina
Hello! I’m working on a 1950s impression for living history and need some help 🙂 I’ve got the poodle skirt down for my 13 yr old daughter, but I was wondering if felt was really the preferred fabric, or if there is something else I should be using to make it more authentic. Secondly, what fabrics and colors were used in dressed that a mom like me would wear? Thank you for your help! -aw
Hello Abigail!
Yes, felt was the original material used to make circle skirts since it was made wide enough to cut the entire skirt in one piece. In fact, the lady that really started the “poodle skirt” phenomenan didn’t have much experience sewing, so she chose that material to make the project easier for her! As far as colors go, I know that blue and red were very popular in the 50s, and you could also make a grey one to coordinate with different colored tops.
Hope this helps!
Katrina
(Just repeating a comment I made on New Vintage Lady blog about this dress pattern!)
I found a 1954 example of the walkaway dress in my rummaging around the Australian Women’s Weekly:
http://vivatvintage.tumblr.com/post/6366763700/the-secrets-out-with-new-miracle-fibre-vilene
It has a stand-up collar in the design and it looks like, as the ad says, the secret is a lot of Vilene interlining!
Hello Sonia,
Thanks for sharing that! If I am reading the print right, that is not actually the walkaway dress pattern, but “Butterick 4628”. It may have had a very similar fit, though. The only graphics I’ve found so far that are original to that design from the 50s but not from the pattern itself is the clip art I used in the walkaway button. It came from a early 1950s magazine ad that Sarah of http://www.colorkitten.com sent me. But maybe one of these days we’ll find an actual photo of the walkaway dress pattern made up “way back when”! I think the answer lies in interviewing women who sewed back in the 50s.
Happy sewing!
Katrina
[…] most sewer’s reviews of Butterick 4790, Butterick 5556 is perfectly designed for the modern figure, and requires few if any […]
Wow, some great advice for this pattern. I have the pattern and was not that interested in sewing it after seeing other version on the internet as well as the picture in your post – it looks nothing like the original! If I get around to sewing this, I will definitely come back to this post. Have you thought about doing any sew alongs for 2012?
Hello Annabelle! Glad you liked this post! I’m not sure that I’ll do another sew-along for Butterick 4790 all over again, but people are always more than welcome to ask any questions about this one and post pictures of their finished results! But I am certainly hoping to do a couple of other vintage pattern sew-alongs in the upcoming year. : )
Happy sewing,
Katrina
I appreciated your inviting me to check out your dress (from the retro blog). I love the alterations that you made, it totally makes a difference, thank you for including instructions and sharing. I can’t wait to make the dress for myself using your tips.
Great Job!
Green Girl
[…] “walkaway dress” de Butterick. Mais là où la réédition de Butterick demande de nombreux ajustements pour obtenir une coupe ajustée plutôt qu’un tablier d’hôpital (le résultat est […]
Lovin it – it so suits you
Thank you for this post! I have this pattern and have never made a dress from it which I liked, I always thought I was doing something wrong! I will try it again using your instructions ^^
I REALLY wish I had seen this before I completed my own version of this dress last weekend. It’s too late to alter now, but you can bet I’ll be printing this tutorial to slip in with the pattern instructions.
Cheers!
~Paige
So glad you liked it, Paige!
You’ve mentioned the collarbone circumference but I can’t seem to find anything on how to measure it.
Thanks,
Karen
Hello Karen!
I had a sewalong for this dress where I gave detailed instructions and pictures on how to fit the dress. You can find the pictures for measuring the “above bust/collarbone” measurement here: https://edelweisspatterns.com/blog?p=884
Hope this helps!
Katrina
Thanks! I never connected the “collarbone circumference” with the “above bust measurement”. Onward!
Happy to help, Karen. : )
just bought this pattern on sale at joann’s and I’m so glad I found this blog before starting on the project. I’m going to need to refer back to this for sure. Thanks for taking the time to enlighten.
Hi, Sherry!
So glad you found this! I’m sure your dress will turn out wonderfully, and please don’t hesitate to let me know if you have any questions along the way. : )
Happy sewing!
Katrina
Hello! I’ve just come across this as I’m researching into pattern reviews before I make this dress to wear to a wedding.
I’m slightly confused with adjusting to fit the collar bone as the back of the pattern that I’ve viewed online doesn’t mention any above bust measurement. Can you explain what you measured and where you altered this on the pattern? I also realise this blog was posted in 2011, so it’s probably been a while since anyone has commented. Hope you can still remember what you did :p
Thanks in advance 😀
Hello, Laura,
Actually I have very detailed information on this very issue on my sew-along that I held on my blog for this pattern: https://edelweisspatterns.com/blog?p=884
There are four or five instructional posts on how to sew the dress and fit the pattern, but the one I linked to deals specifically with the above bust measurement and corresponding alteration.
Happy sewing!
Katrina
I find the way the skirt fits with the flat front panel underneath and wraparound part over the top makes it hard to wear a petticoat underneath – do you fasten the split skirt together at the front so it doens’t expose the crinoline or wear the crinoline beneath both skirt layers?
Hi Charlotte!
Yes, I actually had the same issue so I wrote up an entire article on how to create a custom crinoline that won’t make the front panel bunch up: https://edelweisspatterns.com/blog?p=850
Hope this helps!
Happy sewing,
Katrina
Hi, I too so happy to have found your blog before I made this dress! Regarding the comment that I copied below, couldn’t you just trim the front of the skirt so that it would stay open like in the drawing? Thanks so much for sharing your knowledge and skills!
“As far as the skirt goes, the skirt does not naturally hang open as wide as the illustrations show either with or without the crinoline underneath. I am currently studying four versions of the Butterick walkaway dress pattern (one from the 50s!), and the pattern back then was nearly exactly what the skirt is now. When wearing the walkaway dress you can spread the circle skirt apart (to the sides) if the dress is made of a stiffer fabric like a cotton broadcloth, but mainly the pattern cover was drawn like that in order to illustrate how the dress was constructed and just what pieces it had. The only way I’ve found that the skirt will actually do that is if you sew one side of snap to the inside of the circle skirt and the other side of the snap to the right side of the front sheath panel. That way it will hold it in place, but you can still unsnap it to come to the center front when you prefer.”
Hi Nani!
Well, you *could* cut away the skirt center front at an angle if that was the look you were going for. Personally I like it best as it is, because it can look closed like a normal skirt or have the two toned effect when you’re walking. But yes, you certainly could! 🙂
[…] had a heads up on this pattern from Cindy at Edelweiss Patterns Blog She explained that a lot of the ‘Retro’ patterns are redesigned for the ‘modern […]
[…] case you haven’t read my post on how to fit this vintage dress pattern, you may want to do so before starting to sew your dress […]